
Tinker Bell pumpkin templates offer a starting pattern for a fairy-themed seasonal decoration. These two downloadable packs contain an original fairy silhouette and a fairy with a pixie-dust dot guide, supplied as printable PDF, SVG and PNG files. The artwork is an original Tinker Bell-inspired interpretation, not official Disney artwork. The patterns are designed primarily for tracing or painting. Their detailed wings and limbs are not a pre-bridged cut-through carving design.
Compare the two downloads with your actual project in mind. The previews show the supplied layout or artwork, including the prompts and demonstration elements that explain how it is organized. Choose the option that best fits a fairy-themed pumpkin tracing or painting project, then edit a separate copy. The file descriptions below identify what is editable and what needs to be replaced before the result is ready to use.
Compare the two downloads
| Template | Download format |
|---|---|
| Fairy Silhouette Tracing Pattern | Printable PDF, SVG and PNG in ZIP |
| Fairy and Pixie Dust Dot Pattern | Printable PDF, SVG and PNG in ZIP |
Choose the pattern around the pumpkin surface
The first pattern concentrates on the fairy figure, while the second adds a curved trail of dots. Compare the available surface with the width of the design before printing several copies. A tall, relatively smooth area gives the figure more room than a deeply ribbed or very narrow section. Turn the pumpkin until you find a face that lets the main silhouette sit comfortably. Keep the stem and any natural marks in mind as part of the composition rather than placing the pattern without considering the object beneath it.
Print a test and check the scale
The PDF pages use Letter size. Print a paper test at actual size and hold it against the pumpkin before transferring the design. The page includes a heading and instructions, so use the artwork area when judging the fit. If you resize, keep the proportions the same in both directions. A curved surface can make a flat drawing look wider or narrower once attached. Small cuts around the outside margin of the paper can help it sit more comfortably without cutting through the design itself.
Transfer the silhouette in manageable sections
Clean and dry the area you plan to decorate. Position the paper and secure it without relying on one loose corner. Trace the main body, wings and limbs in sections, checking alignment before removing the sheet. Use the transfer method appropriate to the materials you have chosen and test it on a less visible area first. The dot pattern is a spacing guide; you can simplify the number of dots to suit the surface. Preserve the relationship between the figure and the trail rather than trying to force every printed detail onto a difficult rib.
Download the templates and view the previews
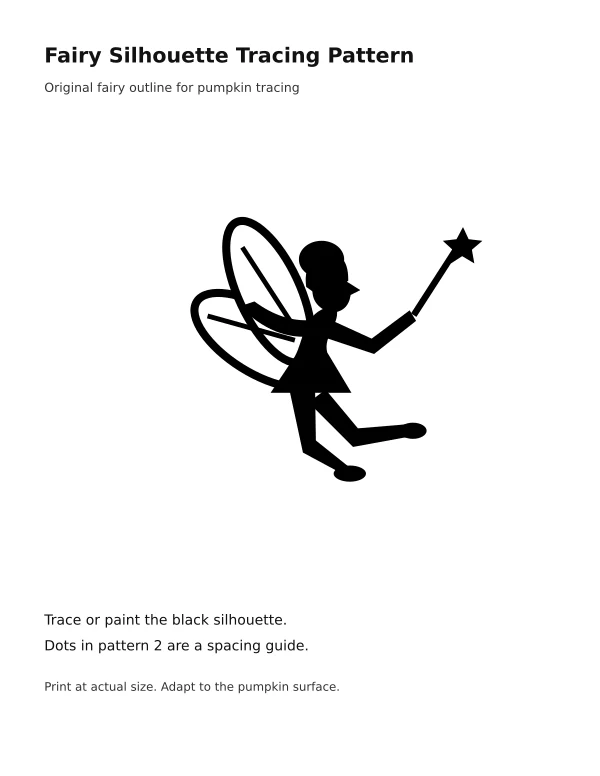
Fairy Silhouette Tracing Pattern
The preview shows the printable pattern. The ZIP contains a Letter-size PDF, an SVG source and a high-resolution PNG. Test the scale against your pumpkin before transferring. Keep an original copy of the download and save your project under a separate descriptive name.
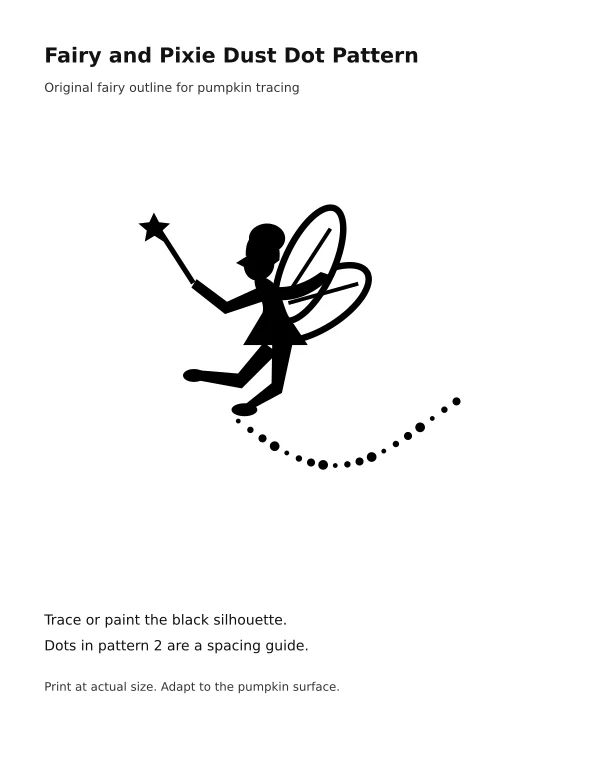
Fairy and Pixie Dust Dot Pattern
The preview shows the printable pattern. The ZIP contains a Letter-size PDF, an SVG source and a high-resolution PNG. Test the scale against your pumpkin before transferring. Keep an original copy of the download and save your project under a separate descriptive name.
Choose painting or carefully planned decoration
The patterns are best suited to a traced or painted silhouette. The wing outlines include internal spaces, and the figure has narrow areas that would need redesign and support for a cut-through carving. Do not assume a printable silhouette is automatically a structurally supported carving stencil. If you choose to cut any part of the pumpkin, have an adult handle appropriate tools and plan the support before starting. For illumination, an LED light gives a practical way to display the decoration without placing a flame inside the design.
Details to check before using the template
- Pattern choice
-
Use the single figure when the pumpkin surface is limited or you want a simpler composition. Choose the dot-trail version when there is room beside and below the fairy. The designs can be mirrored or resized through the SVG or printing process, but check the result against the actual pumpkin before committing to it.
- Print size
-
Judge the size from the artwork, not the paper edge. Keep the proportions intact and make a test print when the pumpkin has a strong curve. A smaller copy may be easier to transfer, but very small wings and limbs can become difficult to trace cleanly or paint with the tools you have.
- Surface preparation
-
Use a clean, dry surface and check whether the intended medium adheres to it. Natural texture affects fine lines. If the pumpkin has deep ribs, move the figure or simplify the detail rather than expecting a flat print to transfer perfectly across every ridge without adjustment.
- Transfer marks
-
Make marks that you can follow without confusing them with the final decoration. Work in sections and check the main outline before lifting the paper completely. Keep the printed copy nearby while painting so the narrow parts of the figure and wing openings remain recognizable.
- Dot placement
-
Treat the dots as a visual trail rather than a required count of holes. You can paint them or transfer their positions for your chosen technique. Varying their size is part of the pattern, but reduce the detail if the available surface or tool makes the small marks impractical.
- Display and storage
-
Choose a stable display location and keep the completed decoration away from places where it can be knocked over. Store the PDF and source artwork together if you want to reuse the pattern. A photograph of the finished placement can help you judge what size or orientation worked best for a future project.
A practical example
For a medium pumpkin, start with the single-figure pattern, test the paper against the surface and trace the main outline before the smaller wing details. Paint the figure and let the medium dry as its instructions require. On a wider pumpkin, the second pattern can place the fairy to one side and use the dots as a gentle trail across the remaining surface. The dotted marks do not need to become drilled holes.
How to prepare the finished version
- Prepare a test print. Choose the single figure or the dot-trail design and print one copy before preparing the whole project. Compare the artwork with the intended pumpkin surface, including the curve near the edges. Resize proportionately if needed and keep the test copy so you can repeat the setting. Use the printed illustration as a guide rather than treating the paper dimensions as the required decoration size.
- Place the pattern before transferring. Position the figure where the main body and wings will be visible from the intended viewing angle. Secure the paper in a way that keeps the design aligned while you work. If the surface has strong ribs, adjust the placement or simplify a detail. Check the silhouette from a short distance before transferring the narrow parts of the figure.
- Trace and check the main outline. Transfer the larger shapes first, then add the smaller limb, wing and star details. Check the relationship between them before removing the paper completely. Keep the original print nearby while you decorate. If a line becomes unclear on the pumpkin surface, refer back to the pattern and redraw it deliberately rather than guessing from a partially transferred mark.
- Finish the decoration for its intended display. Use the medium and drying process appropriate to your materials. The patterns are suitable for tracing and painting; any cutting requires its own support plan. For the dot trail, choose a number and spacing that the surface can accommodate. Once the decoration is complete, inspect it from the viewing position and use a stable display location.
A final project review
For a group craft session, prepare the materials around the chosen technique before guests arrive. Keep a sample print showing the final placement and make a small test with the paint or transfer medium on the intended surface. Set aside time for drying according to the product instructions, and give each participant enough space to work without disturbing another pumpkin. The single figure can be a simpler starting option, while the dot trail adds a little more detail. Keep spare paper copies available so a damaged transfer sheet does not interrupt the activity, and save the source files for resizing the pattern next time.
Bring a fairy-tale touch to pumpkin carving
Pumpkin carving does not have to mean the same triangle eyes and jagged grin every autumn. A fairy-themed pumpkin, built around a slender winged silhouette and a sprinkle of glowing dots, gives your porch or windowsill a softer, more magical look. The tinker bell pumpkin templates in this collection are designed for exactly that: one stencil traces an original fairy silhouette with wings and a wand, and the other turns the pumpkin into a canvas for a pixie-dust dot pattern that you can carve, drill or paint.
Because the designs are inspired by classic storybook fairies rather than copied artwork, they are suitable for home decorating, school crafts and family activities. The files come in PDF for easy printing, SVG for resizing or cutting machines, and PNG for quick previews or digital mockups.
What these pumpkin templates are for
A pumpkin template is a printable outline that you transfer onto the surface of a pumpkin before cutting or painting. It solves the hardest part of pumpkin art, which is drawing a balanced, recognizable shape freehand on a curved surface. With a stencil, you can focus on careful cutting and lighting instead of guesswork.
These two designs serve slightly different purposes:
- The fairy silhouette stencil is a bold outline that glows clearly when a candle or LED light shines through. It works best on medium to large pumpkins with a smooth face.
- The pixie-dust dot design is a scatter of circles and small stars. It can be drilled with a hand drill, poked with a clay tool, or painted for a no-carve pumpkin that is safer for young children.
How to use a tinker bell pumpkin template step by step
- Pick the pumpkin. Choose one with a flat, unblemished side and a sturdy stem. Lighter-skinned pumpkins are easier to see pencil marks on.
- Size the print. Open the PDF or SVG and scale it so the design fills roughly two-thirds of the pumpkin’s face. Print a test sheet on plain paper and hold it up to check.
- Prepare the pumpkin. Cut a lid at the top or a hole in the back, then scoop out the seeds and scrape the inner wall on the design side to about 2-3 cm thick.
- Attach the stencil. Tape the paper to the pumpkin, making small cuts around the edge so it lies flat against the curve.
- Transfer the outline. Use a pin, push pin or pounce wheel to poke small holes along every line, spaced close together. For the dot design, mark the center of each circle.
- Remove the paper and check. Dust a little flour over the holes if they are hard to see, then wipe off the excess.
- Carve or paint. Cut the large silhouette areas first using a small serrated saw, working from the center outward. For dots, drill or paint each one.
- Light it safely. Use a battery LED light, especially indoors or around children.
Choosing between carving, etching and painting
Full carving
Cutting completely through the shell creates the brightest glow. The silhouette stencil is designed with connected wing tips and wand so the design holds together when cut.
Surface etching
Shaving away only the orange skin, without cutting through, gives a softer amber glow and lets you show fine wing details that would be too fragile to cut out.
Painting
Acrylic paint or paint pens let younger children join in without knives. Trace the stencil with a pencil, then fill the fairy in a dark color and add metallic or glow-in-the-dark dots for the pixie-dust effect.
Mixed technique
Carve the fairy silhouette, then paint or drill the pixie-dust dots around it. This combination works well on large display pumpkins.
When to use these templates
These designs suit autumn harvest festivals, Halloween porch displays, classroom pumpkin contests, fairy-themed birthday parties in October, and library or community craft sessions. The painted dot version is a popular choice for preschool and early primary groups because it avoids sharp tools altogether, while the carved silhouette suits older children working with adult help and teens or adults who enjoy detailed carving.
Tips for clean results
- Work with a fresh pumpkin and carve no more than a day or two before display to reduce shrinking.
- Keep carving tools small and sharp; small saws give more control than large kitchen knives.
- Support thin sections, such as the wand, by cutting them last.
- Rub a thin layer of petroleum jelly on cut edges to slow drying.
- If a piece snaps off, reattach it with a toothpick.
- For painting, wipe the pumpkin clean and let it dry before applying paint.
- Use the SVG file with a cutting machine to make a reusable vinyl or card stencil for painting several pumpkins.
Common mistakes to avoid
- Printing too large. Oversized stencils wrap too far around the curve and distort the fairy’s shape.
- Leaving the wall too thick. Light will not shine through properly; scrape the design side thinner.
- Cutting delicate parts first. Weak areas break when you later press on the pumpkin.
- Spacing pin holes too far apart. Curves look jagged when the dots are hard to follow.
- Using real candles near decorations. LED lights are safer, particularly indoors.
Worked example: a classroom fairy pumpkin session
A primary school teacher plans an autumn craft afternoon for 24 pupils. She prints the pixie-dust design at a smaller scale on A4 paper, one per child, and the fairy silhouette at full size for a single large class pumpkin that she and a teaching assistant will carve. The children tape their dot templates to small pumpkins, mark each dot with a pencil through the paper, and then paint the dots in silver and gold. Some add their own extra stars.
Meanwhile, the class pumpkin is carved with the fairy silhouette and lit with an LED tea light for the end-of-day display. The teacher records which pupils attended using an attendance sheet, sends home a short note, and later turns a photo of the display into a newsletter header using one of the PNG backgrounds as a frame. A parent volunteer plans the next session with a daily planner.
Extending the fairy theme
The same artwork works beyond pumpkins. You can resize the SVG to make window clings, party bunting, cupcake toppers or invitation decorations. A parent planning an autumn fairy party could match place cards using the place setting templates, or print a matching photo page in a photo album template after the event. Keeping the same silhouette across items gives the whole celebration a coordinated look without extra design work.
Safety for family carving
Pumpkin carving tools are sharp, and pumpkin skin is slippery. Always carve on a stable, dry surface, cut away from your body, and keep hands behind the blade. Children should paint or mark designs while adults handle cutting. Clean and dry tools after use, and supervise any lit pumpkins. If you use LED lights, check battery compartments are secure around small children.
Storing and reusing your stencils
Paper stencils usually get damp and torn during carving, so print a spare copy before you start. If you plan to use the design every year, trace it onto thin card or acetate, or cut it from vinyl using the SVG file. Label each stencil with its size and the pumpkin it fitted best, and keep them flat in a folder with your other seasonal craft sheets. Next autumn you can skip the resizing step and go straight to carving or painting.
Tinker bell pumpkin template FAQs
Are these official character designs?
No. They are original fairy designs inspired by classic storybook fairies, intended for personal and classroom craft use.
Which file format should I print?
Use the PDF for quick printing at a set size. Use the SVG if you want to resize precisely or use a cutting machine. The PNG is best for previews.
Can I use the templates without carving?
Yes. Trace the outline and paint it, or use the dot design with paint pens or stickers for a no-carve pumpkin.
What size pumpkin works best?
Medium to large pumpkins with a smooth face work best for the silhouette. Small pumpkins suit the dot design.
How do I stop the carved pumpkin from rotting quickly?
Keep it cool and out of direct sun, carve close to display day, and coat cut edges lightly with petroleum jelly.
Can I use the stencil on artificial pumpkins?
Yes. Craft pumpkins can be carved with a craft knife or painted, and they last for years.
Conclusion
The tinker bell pumpkin templates make it easy to create a magical fairy-themed pumpkin, whether you carve a glowing silhouette or paint a sprinkle of pixie dust. Choose the right size, transfer the outline carefully, cut or paint in a sensible order, and light your work safely. Download the PDF, SVG and PNG files below, and explore more seasonal printables in the category archive. Whether it is your first carved pumpkin or your tenth, a good stencil, a steady hand and a little patience will give you a glowing fairy display.
Related resources
Use the daily planner templates to organize a group craft session. The pull tab flyer guide can help with a local activity notice. For a workshop, sign-in sheet templates provide a separate attendance record.
Frequently asked questions
Are these official Disney pumpkin patterns?
No. They are original Tinker Bell-inspired fairy interpretations, with their own outlines and arrangement.
Can I carve straight through every black area?
These are tracing and painting patterns, not pre-bridged cut-through stencils. Detailed wings and limbs would require a separate structural carving plan.
Which file should I print?
Use the PDF for a fixed Letter-size page, the PNG for an image workflow or the SVG when you want to resize or adapt the vector artwork. Test the size against the pumpkin first.